
May Gardening Tips
May 2014 Newsletter
Eight Great Reasons to Grow
Heirlooms
Why grow heirlooms? - a question asked often. Have you always purchased hybrid seed or grown seed you find at your garden center, or are wondering if there is a good reason to grow heirloom varieties instead? There are many advantages to growing heirloom vegetables over other kinds of seed. Here are a few great reasons:
First, heirlooms taste great! Their commercial counterparts the hybrid and GMO seeds are developed to grow quickly and cheaply, with the highest yields possible. Rather than taste, overall uniformity and a long shelf life are key traits wanted by commercial growers. That’s why the tomato at the store tastes bland compared to the one you buy from the small local farmer. If you choose to grow heirlooms, you’ll be choosing superior taste that you simply cannot buy at the supermarket.
Heirlooms Help You Save Money. Heirloom seeds are open pollinated which means you can save your seed year after year. With heirlooms you can buy one packet of seed and never have to purchase them again. Save seeds at harvest time and store it. Repeat the process next year.
Research suggests heirlooms are more nutritious than their by growing your own heirlooms and saving your seed each year, you will end up with the healthiest plants possible. Heirlooms will adapt naturally over time to their environment. They will respond, adapt, and change to the climate and local pests and diseases without the need of franken-science. Simply save seed each year from your healthiest, most robust plants and plant them again the following year.
Behind nearly every heirloom vegetable, there is a story to be told. Passed down from generation to generation through the years, heirlooms are a living piece of history. For instance, you can grow several of the same varieties of vegetables Thomas Jefferson himself grew at Monticello.
Heirlooms are worth growing for so many great reasons. Won’t you try growing some? You won’t regret it.
* * * * * * * *
Natural Fly Killer ~ A Ziploc Bag of Water ~
By WayCoolDogs
In summer the fly is standing in line to attack everything that does not move, especially our dog. The natural fly killer is something we prefer more than a commercial fly killer and are always looking for something thatworks to get rid of each and every fly within range of the dog kennels, patio, yard, and inside the house.
However, something we never knew existed was the Ziploc bag of water as an indoor and outdoor fly killer.
A Ziploc bag of water as a natural fly killer?
At first, we were very skeptical of the idea of a Ziploc bag of water used as a natural fly killer. Especially one that would cause flies to run for cover at such a low cost. But we thought to ourselves, “Why not?” With every rescue dog fighting them every summer, we felt a Ziploc bag of water for an easy and natural fly killer was something we could afford and was safe for our dogs. After all, we were not going to be out much for four cents if it did not work.
We hung three half-filled Ziploc bags of water in the kitchen, with four pennies in each bag. There. We had our natural fly killer up and were waiting for the flies to land - somewhere but on the dog waiting patiently below the Ziploc bag to see what would happen next.
We had tied the closed bags with a twine and hung them (with most of the air removed) in varied corners in the kitchen, porch and outside patio. Within one hour more than three-fourths of the flies were gone. Try it yourself. There are lots of natural fly killer methods out there, but none are as cheap as the zip lock bag filled with water and four shiny pennies at the bottom!
Many people swear that a Ziploc bag filled half-way with water and attached over entryways will repel flies. No one yet knows how or why it works, but there is speculation that it has something to do with the way the moving water refracts light. Please share your results with the rest of us.
Reviews from our readers: May 16, 2009 ~ From D. J. ~
Regarding the science behind Ziploc bags of water? My research found that each of the millions of molecules of water presents its own prism effect and given that flies have a lot of eyes, to them it’s like a zillion disco balls reflecting light, colors and movement in a dizzying manner.
When you figure that flies are basically prey for many other bugs, animals, birds, etc., they simply won’t take the risk of being around that much perceived action. I moved to a rural area and thought these “hillbillies” were just yanking my city boy chain but I tried it, worked immediately! We went from hundreds of flies to seeing the occasional one, but they don¹t hang around long. ~ DJ
* * * * * * * *
May 2013 Newsletter
Stay out of the garden when the vegetable plant leaves are wet. Walking through a wet garden spreads disease from one plant to another.
Four or five layers of newspaper will serve as an effective mulch in the garden. Cover it with grass clippings or straw to prevent it from blowing away.
Watering roses with soaker hoses or drip irrigation will reduce the spread of black spot disease.
When planting your annuals if you loosen up the roots a bit before planting it will stimulate stronger growth.
Remember to rotate vegetable crops to help control pests, disease and keep
the soil in good condition.
For better blooms next year, resist the temptation to cut back your daffodils
until they have almost completely died back.
Purchase annuals without flowers so that you can enjoy the blooms longer.
Choose shorter bushy plants because the larger ones are more established
already and may not transplant as well.
A dark green color is generally a good indicator of a strong healthy plant. (Make sure that they are not light colored or yellowing. Nor should they have brown patches)
Divide overgrown perennials and establish new beds with the divisions
Continue to prune spring flowering shrubs after flowers fade.
* * * * * * * *
To grow annuals in containers on the patio, use a light weight soil mixture.
Keep the plants well-watered, because the soil dries out fast. Apply a water soluble fertilizer according to package directions every two weeks.
Never throw away that extra flower--the scraggly ones left in a six-pack, put them all in one pot. It will be the best one you have. Fill in the gaps with Lobelia or plant them in a small pot & give to a neighbor child who will turn on early to gardening.
In late May, start an "Annual Mixture" flower bed from seed. Don't bother thinning very much. By August & September you will have great flowers for indoor arrangements. (Sally A., Anchorage)
When cutting poppies to bring indoors, immediately singe the cut end with a lighter so the hollow end of the tube will seal & the flower will keep longer without wilting. (Jennifer K., Anchorage)
* * * * * * * *
Planning Your Patch
Which way should your rows run?
In temperate climates, make your vegetable rows from east to west so that all the plants receive maximum sunshine. In hot arid climates, run the rows from north to south so that each plant will be shaded by a neighbor on the warm south side.
The neatest gardens have straight rows, which is important if you use a
tiller to cultivate between plantings. But it’s harder than it looks to make straight garden rows freehand. For planting heavy seeds, such as beans, put sticks in the ground at each end of a row and run a piece of string between them to guide you as you plant. To plant dozens of lightweight seeds in a
snap, cut a piece of string the same length as the row, wet it thoroughly, and sprinkle the seeds directly on it. The moisture will make seeds stick long
enough to lay the string in a prepared furrow. Just cover the string with soil and you’re done!
Keep everything within easy reach.
To make tending beds easier, make them no wider than the spread of your arms - that’s about 4 feet (1.2 meters). Design a main path wide enough for a wheelbarrow, at least 3 feet (1 meter) wide, and include footpaths 1 foot (30 cm) wide between beds. To suppress weeds and provide a clean place to walk, keep paths covered with straw, chopped leaves, boards, or strips of scrap carpeting.
Make the most of limited space.
Plant vertical crops, such as peas and pole beans, which take up little ground space. Or try dwarf varieties, such as ‘Tom Thumb Midget’ lettuce and ‘Tiny Dill’ cucumbers. Many dwarf varieties can also be grown in roomy containers kept on a deck or patio.
Protect vegetables with old tires.
If you’re eager to get an early start in spring, plant your tomatoes, potatoes, eggplants, peppers, or other vegetables inside old tires laid on the ground. The tires will protect the plants from harsh winds, and the dark rubber will absorb heat from the sun and warm the surrounding soil.
Leave room for blooms.
Flowers in the vegetable garden not only make it a more pleasant place to work, but also have practical uses. Many flowers attract beneficial insects, such as bees, ladybugs, and lacewings, while others may repel pests in search of your vegetables. Try French marigolds, cosmos, and zinnias as well as edible flowers like nasturtiums and violets.
Beans boost soil nitrogen.
Beans, peas, and other legumes are among the few plants that enrich the soil
with nitrogen - an element essential for plant growth. Legumes begin using up the nitrogen they’ve stored when they blossom and set fruit. If you pull them up early, they will leave nutrients behind in the soil that can be used by other plants.
Fill up the season.
After harvesting a cool-weather crop (spring peas or spinach, for example), replant the space with a warm-weather vegetable (green beans or summer
squash). Inter-plant quick growers (radishes) with slower ones (tomatoes). The short-term crop will be up and out before the slow grower can crowd or
shade it.
Grow vegetables that look as good as they taste.
Many common vegetables are attractive enough to be used as ornamentals. Use ‘Tequila Sunrise’ or ‘Chocolate Bell’ peppers and ‘Violet Queen’ cauliflower to add color to the vegetable garden. For textured or colorful
leaves, plant red chard, savoy cabbage, or ‘Red Sails’ lettuce.
Scare off birds with reflective tape.
An innovative way to keep birds away from your vegetables is to hang strips of reflective tape over the plants. When the tape flutters in the breeze, it casts light across the garden, which spooks wary birds.
Shield your vegetable garden.
For centuries gardeners have used companion planting to repel insect pests.
Aromatic plants, such as basil, tansy, marigolds, and sage are all reputed to send a signal to bugs to go elsewhere, so try some near your prized vegetables. Mint, thyme, dill, and sage are old-time favorites.
May 2010 Newsletter

|

|
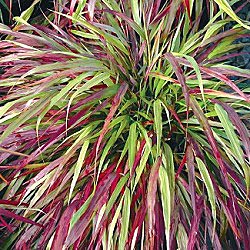
Grasses
by Gayle
Christine Bingham, master gardener, convinced us why we should utilize ornamental grasses (including true grasses, sedges, rushes and cattails) to enhance our gardens.
To start with, grasses don’t need staking, spraying or pruning, even those that can grow up to 7 feet tall (“Karl Forester AKA Calamagrostis x acutiflora”).
Moose don’t generally eat them and there are hundreds of varieties with different colors, shapes and sizes.
They provide year-round interest. After cutting them low in May you will see abundant new growth by late May. July brings their flowers (yes flowers), August they are in full bloom, and September brings on changes in
color. They become radiant as fall’s low angle light shines through them and add form and interest to winter.
That distinctive rustling sound and swaying movement treat all the senses. Grasses come in many colors and shapes and can set off the other plants in your garden. Grasses like well drained soil with full sun, but can be success- fully grown in less optimal conditions. They don’t need or like too rich of a soil or too much fertilizer.
They should be watered the first year but require less maintenance once established. Most should be trimmed low but DO NOT trim a blue colored grass.
Most grasses do not spread wildly or seed everywhere. Many varieties are actually sterile and will not take over a natural setting. One variety that does is the popular ribbon grass and should be contained with concrete barrier or grown in a pot.
There are many native and non-native grasses that survive in Alaska's perennials, especially those considered cool season varieties. Others can be grown as annuals or even dug up and wintered over.
You can purchase grasses at a number of local nurseries such as Sutton’s Greenhouse, Alaska
* * * * * * * *

Recipe for cut flowers
1 quart water
1/2 can 7-up
2 aspirin, crushed
1/2 tsp bleach
Use with water in a vase of cut flowers to prolong their life.
1 quart water
1/2 can 7-up
2 aspirin, crushed
1/2 tsp bleach
Use with water in a vase of cut flowers to prolong their life.
Cut Flower Preservative Recipes
You know if you put fresh cut flowers in water it will help keep them from wilting. If you have a packet of cut flower preservative from a florist or the store, it will help the flowers to stay fresh much longer. You can make a cut flower preservative yourself, however. There are several good recipes made using common household ingredients.
Keys to Keeping Cut Flowers Fresh
Give them water.
Give them food.
Protect them from decay or infection.
Keep them cool and out of direct sunlight.
The floral preservative provides flowers with water and food and contains a disinfectant to prevent bacteria from growing. Making sure your vase is clean will also help. Discard any decaying leaves or flowers, because the freshness of flowers is influenced by the gases and bacteria found on wilted or rotting plant material. Also, don't set your flowers near ripe fruit, because the chemicals from the fruit (such as ethylene) will 'ripen' your flowers. If you can, keep your flowers in a cool location and out of sun. Minimize air circulation, since it speeds evaporation and can dehydrate your flowers. Trim the bottom ends of your flowers with a clean, sharp blade before arranging them in the vase containing the floral preservative. Cut the stems at an angle to increase the surface area for water and to prevent the ends from resting flat on the bottom of the container. In all cases, mix the floral preservative using warm water (100-110°F or 38-40°C) because it will move into the stems more effectively than cold water. Clean tap water will work, but if it is very high in salts or fluorides, consider using distilled water instead. Chlorine in tap water is fine, since it acts as a natural disinfectant.
Cut Flower Preservative Recipe #1
2 cups lemon-lime carbonated beverage (e.g., Sprite or 7-Up)
1/2 teaspoon household chlorine bleach
2 cups warm water
Cut Flower Preservative Recipe #2
2 tablespoons fresh lemon juice
1 tablespoon sugar
1/2 teaspoon household chlorine bleach
1 quart warm water
Cut Flower Preservative Recipe #3
2 tablespoons white vinegar
2 tablespoons sugar
1/2 teaspoon household chlorine bleach
1 quart warm water
More Tips
Outwitting Weeds
Go after crabgrass as soon as it appears in the garden by digging it out by the roots with a spading fork or smothering it with black plastic. Don’t let it go to seed.
Use a 4-inch-deep layer of organic mulch such as grass clippings, straw, or chopped leaves to cover dirt walkways and deter weeds in the vegetable garden. Turn them over with the soil in the fall.
Keep weeds away from young crops during the first 4 weeks. The crops will stand a better chance of competing. (Not that you should relax after that!)
While weeding, hold the trowel vertically (like a child holding a crayon) to eliminate strain on your wrist.
If digging out weeds is difficult for you, at least resolve to keep them from setting seed. Sharpen a hoe and chop off their heads once a week.
* * * * * * * *
May 2010 Newsletter
The Herb Corner
The Gardener's Weather
by Florene
In the spring, Alaskans are particularly focused on the weather as they plan their planting schedule.Will it rain, blow, snow, or will we have a warm sunny day.We are poking about in the garden trying to see what survived and what we must replant. The evening News is a must because Jackie might have some special weather coming our way. Here are some weather proverbs that might help:
·If the leaves show their undersides, beware of foul weather.
·When the dew is on the grass, rain will never come to pass.
·When you hear the rain crow call, the rain will fall.
·When the wind’s in the south, the rain’s in its mouth.
If these don’t work, try looking at your garden.Clover, chickweed, dandelions, morning glories, anemone, and tulips are said to fold their petals prior to a rain.If the marigold opens before seven, you’ll soon hear thunder; if they stay open all day, you’re in for sunshine.
A changing climate is upon us and weather is becoming a daily question. Keeping a weather journal so you can have an idea from year to year what might be happening is a great exercise. It’s fun to look back and see that on a day when we are having an unseasonable snowfall, there was sunshine three years ago. (or maybe the other way around!)
Weather is a great metaphor for life – sometimes it’s good, sometimes it’s bad, and there’s nothing much you can do
about it but carry an umbrella. - Pepper Giardino
* * * * * * * *
May 2010 Newsletter
TIPS FOR CHILLY MICROCLIMATES
Gardeners in USDA Zone 4 or colder, especially those who live in cold pockets (you know who you are), are often reluctant to plant tender crops such as tomatoes, melons, and peppers until the very end of May. If you fear a late frost, here are a few tricks.
Lay red plastic mulch (available at garden centers and from garden supply catalogs) around tomato plants to hold in the soil’s heat and increase productivity.
Plant tomatoes at the base of a stone or brick wall. They’ll benefit from the heat it retains.
Mount a pile of compost two feet deep and plant melon seeds in it. The compost will generate warmth in addition to providing nutrients and good drainage.
To protect young peppers, use black plastic to warm the soil and cloches or a light covering on chilly nights.
Peppers will not set fruit if temperatures are below 65°F during the day.
Watering Basics
Use a rain gauge or mark off inches on a straight-sided can to keep track of rainfall. If you receive less than an inch a week, get out the sprinkler.
When putting flower or vegetable transplants into the garden, lessen the shock to their roots by soaking the plants and the place where you’re putting them until the soil has the consistency of mud.
Water all transplants twice a day during their first week in the garden.
To set up an efficient system for watering thirsty plants, dig a 12-inch hole in the garden and sink a large unglazed clay pot into it. Plant a ring of vegetables or flowers around the pot. When you fill the pot to the top with water, it will slowly seep out to the nearby roots.
* * * * * * * *