June gardening tips
June 2012 Newsletter
How to Propagate bulbs
A good method of increasing your bulbs is by a method called 'scaling'. This is where a bulb is sliced and divided into scales so that new bulblets are encouraged to grow on each piece.
Narcissus (daffodils) are a good one to start with as they are easily available in autumn - the best time for scaling - and are big enough to handle without being fiddly. Once you are comfortable with the method, you can go on to propagate other types. Many Snowdrops (Galanthus nivalis), for example, are very expensive and cost up to £30 for one bulb so, although it may be two or three years before you get your first flower, this can be a good way of increasing your bulb supply.
Whilst bulbs can also be propagated from seed, there is always the chance of cross pollination producing an unwanted variant, so scaling ensures that your new plants will be identical to the mother plant (also called 'true to type').
Because handling some bulbs can cause skin irritation, if you are susceptible to skin allergies you should wear light gloves of the type used by nurses, which are available from chemist shops.
Equipment you will need:
Clean, sharp knife
Vermiculite
Plastic bag
Some people also use a fungicide to help prevent rotting, but this is optional. [do take care to keep things extra clean.]
Method:
As always, ensure that the plant material used is free from pests and diseases and is true to type.
Trim old roots off the bulb to prevent rot, but avoid damage to basal plate, which is the tough base of the bulb, where the roots emerge.
Remove the ‘nose’ (the stem end of the bulb) and discard.
Cut the bulb into segments, like an orange; you should be able to get about 8 'chips' from a daffodil bulb if you’re careful and have a good knife.
Make sure that each piece of bulb still has some basal plate for roots to grow from. If there isn't any basal plate, discard that section.
Remove the flower stem from the middle of the cut bulb section and then, using the knife blade, separate off two scales (these are actually unformed leaves), making sure to take some basal plate with it.
The scales should contain the buds that will grow into new bulbs. You may be able to see them already forming between the leaves, but don't force them apart to look as the bulb will still be brittle and may break.
Place the scales in a bag of just-moist vermiculite (about four times the volume of vermiculite to bulb scales), having dusted them with fungicide if you're using it.
Seal the bag, leaving a little air in, and put it in the airing cupboard, or some other warm place, at around 21c.
After care:
Leave for 8-10 weeks, checking regularly for rot, at which time you should see tiny bulblets forming at the base of the scales.
Plant into gritty compost, just covering the bulb and with each scale tip just visible, and not using the usual 3x depth. Label the pot.
Keep the plants just moist in a warm and light place. In spring new leaves will show above the compost.
When the new leaves have died down at the end of the growing season, lift, separate and immediately replant the new bulbs.
* * * * * * *
June 2012 Newsletter
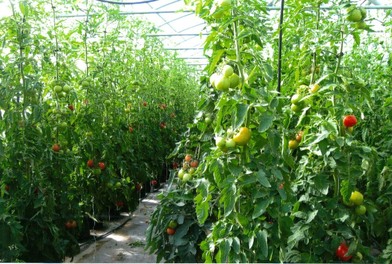
Jerry Z’s Tomato Tips
•24 hour light to discourage budding
•Light fertilizer when first true leaves appear
•Pinch off first bud set
•Pot up at 2-3x pot height
•Sink them deep. Stems will grow roots all the way up to
soil level.
•High nitrogen fertilizer when potting up and every 2-3
weeks until July 4
•Bloom food after July 4
•Stop all growth on July 4, including any unopened blooms (weeks later for greenhouse)
•Pinch any dead or yellow leaves
•Take leaves off below maturing fruit
•Single growing stem for large varieties
•Leave 2-3 low suckers for small or cherry varieties
•Careful not to pinch the growing tip
•Don’t forget to pinch suckers from the suckers
•Water until it comes out of the bottom of the pot
•Shake to self pollinate
•Banana peel in bottom of 5 gallon pot
•Epsom salts in mix and spray if leaves curl up. He uses 3T to a wheel barrow of mix.
•Linda L. said to put the suckers and stems that are cut off in the pot for extra nitrogen.
•For Tumblers, put into wide 8 gallon pots and don’t pinch ends.
•Pat uses Arctic Organics’ fertilizer mix, plus Epsom salts and worm castings.
•Support heavy stems to keep from breaking. If they break but are still attached tape them or tie them up so
they can heal together.
* * * * * * * *
June 2012 Newsletter
DIFFICULT DUTY
If you look around, you can find plants that are suited to any kinds of growing conditions you’ve
got.
Here’s a sampling of perennials that will rise to the challenge and thrive in the most demanding
areas of your yard:
DIFFICULT DUTY
If you look around, you can find plants that are suited to any kinds of growing conditions you’ve
got.
Here’s a sampling of perennials that will rise to the challenge and thrive in the most demanding
areas of your yard:
|
SHADE
Bleeding hearts (Dicentra) Creeping phlox (Phlox stolonifera) Foam flowers (Tiarella) Lady’s mantle (Alchemilla mollis) |
HOT SUN
Basket of gold (Aurinia saxartilis) Blue false indigo (Baptisia australis) Coral bells (Heuchera sanguinea) |
WET SOIL
Astilbes (Astilbe) Bergenia (Bergenia cordifolia) Japanese iris (Iris ensata) Lobelias (Lobelia) |
* * * * * * * * * *
June 2010 Newsletter
How to Plant a Kitchen Garden
By Kathy LaLiberte
Kitchen gardens, or potager, are easier to tend because they have clearly defined beds and permanent pathways. This bed is made with the Copper Cap Raised Bed.
Since colonial times, the typical North American vegetable garden has been a strictly utilitarian venture: a long straight row of beans, next to a row of carrots, a row of tomato plants and a row of onions.
In the 16th and 17th centuries, the royal palaces of Europe often had extensive vegetable gardens. In some
cases, these gardens were designed to be both beautiful to look at as well as productive. The Chateau de Villandry and Versailles are two of the most famous examples of this period. The gardens were planted out in blocks rather than in rows, with the vegetables filling in geometric patterns that were often defined by clipped boxwood or other low hedging. By grouping vegetables in blocks rather than in rows, their foliage texture, color and structure became an integral part of the overall pattern. Blocks of flowers were often used to help create
the tapestry-like patterns.
Over time, these palace gardens, which often covered many acres, were mimicked on a much smaller scale by home gardeners. This was especially true in France, where the humble kitchen garden, or potager, has long been considered an opportunity for beauty as well as utility. More and more of today's home gardeners, be they in southern Franceor southern Michigan, are discovering that potagers make sense for many practical
as well as aesthetic reasons.
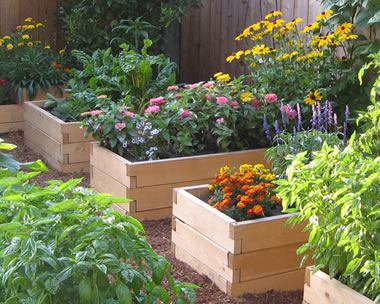
Kitchen gardens, or potager, are easier to tend because they have clearly defined beds and permanent pathways. This bed is made with the Copper Cap Raised Bed.
|
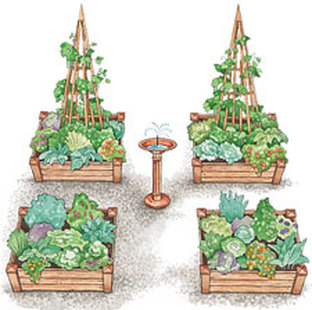
This simple design features four raised beds.
|
On the practical side, small, well-defined garden spaces are much easier to tend. For today's busy gardeners, that's a big plus. Because the beds are planted intensively, there's little room for weeds, and the plants tend to shade each other, which cuts down on watering chores. Potagers, because they're attractive to look at, are usually located relatively close to the house. When a garden isn't relegated to a far corner of the yard, it tends to get better maintained! For yards with poor soil, the well-defined, contained growing areas make it easy to concentrate your investments in soil improvement.
On the aesthetic side, it's quite wonderful to have a garden that's both beautiful and edible. By adding trellises,arborsand statuary, you can create a very attractive outdoor room that provides fresh, healthy food while enhancing your yard.
When creating a planting plan for your potager, it's best to work on graph paper. Divide each bed into 1-foot squares and then plot out the types and numbers of plants you think you'll be able to fit into the space. Think about combining plants that will create patterns of color and texture: a square of red leaf lettuce with deep green basil in the middle; the ferny fronds of fennel surrounding the bold leaves of cabbage. You'll want to
consider spread and height of each vegetable, so the beds don't get too overgrown, and so you're able to find and reach the vegetables as they ripen.
Plants for Kitchen Gardens
The list below is a rough guideline that can be helpful when you're figuring out how many plants will fit into a given space. The measurements are the approximate width you should allow for each plant. Keep in mind that if you live in Texas and know that your tomato plants get to be 3 feet across, rather than 18", you'll want to allow more space. So use your judgment and be prepared to make adjustments as you go along. Have fun!
|
Vegetables
Tomatoes 18" Peppers 12" Kale 8" Lettuce 6" Red Cabbage 12" Fennel 6" Spinach 6" Cauliflower 12" Broccoli 12" Eggplant 12" Bush Summer Squash 18" Bush Cucumbers 18" Bush Beans 8" Beets 4" Celery 8" * * |
Herbs
Basil 8" Parsley 12" Sage 10" Chives 10" Thyme 6" Oregano 8" Cilantro 6" |
Flowers
Calendula 10" Alyssum 6" Dwarf Dahlias 10" Dwarf Marigolds 10" Dwarf Nasturtiums 12" Lobelia 6" Celosia 10" Flowering Kale 10" Dwarf Zinnias 12" |
Plants for Obelisks
and Trellises Sweet Pea Morning Glory Moonflower Black-eyed Susan vine Canary Creeper (Tropaeolum nasturtium) |

|

|
June 2010 Newsletter
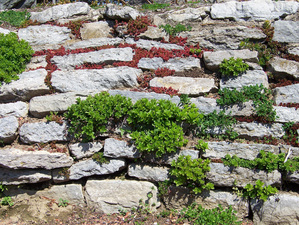
Landscaping with Rocks
To encourage plants to cascade from spaces in a stone wall, fill knee-high nylons with rich soil and knot the tops. Force them into the crevices, knotted end first, cut a slit in the end you can see, and tuck a plant inside.
Plant a slope or rock garden with low-growing sedum, candytuft, phlox, thyme, hen and chicks, low-growing campanula, and moss rose.
Around walkways, stepping-stones, and gaps in brick or stone patios, plant tough, low-growing perennials that can endure some occasional foot traffic without being crushed. Good choices include Roman chamomile, Corsican mint, moss, sedum, thyme, and veronica.
When you need to level heavy stones, use a crowbar to lift them up while a second person replaces the soil underneath.
* * * * * * *
Where to Cut and When
Throughout summer, snip plants regularly to encourage branching and new growth. Harvest
cuttings when-ever you need fresh herbs. Generally, cut no more than one-third of the stem’s length. Exceptions include chives, lavender, and some mints.
Throughout summer, snip plants regularly to encourage branching and new growth. Harvest
cuttings when-ever you need fresh herbs. Generally, cut no more than one-third of the stem’s length. Exceptions include chives, lavender, and some mints.
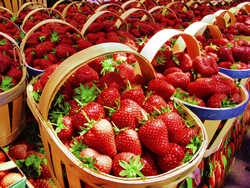
The Joy of Strawberries
Strawberries are a great source of vitamins. For the best-quality berries, don’t wash or hull them until just before you are ready to use them. Wash them before removing the caps so that the berries don’t get water-logged.
The size of strawberries is irrelevant to their taste. Both small and large may be sweet.
If you have to keep strawberries longer than a few hours,
refrigerate them without washing and cover loosely with waxed paper. Berries
mildew quickly, so the best plan is to eat them as soon as possible.
Let small children hull strawberries by pushing a drinking straw through the berry from the bottom. No sharp knives!
Easy Entertaining
Freeze green and red grapes separately in plastic bags. Use them as “ice cubes” to chill beverages.
Hollow out red cabbages, colorful bell peppers, or round loaves of bread and fill them with your favorite dips. These creative containers look pretty, and there are no bowls to wash after the party.
Use edible flowers to decorate platters. Apple, borage, calendula, clover, dandelion, daylily, elderberry, lavender, marigold, nasturtium, orange, primrose, rose, violet, and zucchini blossoms are just a few possibilities.
For evening entertaining, set small clusters of votive candles on a framed mirror to add sparkle to the buffet table. Be sure to place the candles so that no one has to reach across them to get food.
NOTES FOR GARDENERS
Instead of using chemical herbicides, pour boiling water on pesky weeds.
Don’t handle plants immediately after a rainstorm, or you might spread fungal diseases.
In late spring, as soon as flowers fade, prune forsythias by selectively cutting a third of the oldest and thickest
stems to within a foot of the ground. This will maintain the natural fountain shape.
Rejuvenate overgrown rhododendrons after flowering by cutting the stems back to 6 to 12 inches. If a plant has multiple stems, cut back one-third of them each year.
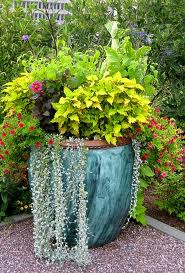
CONTAINER GARDENING: A MOVABLE FEAST
Soak unglazed clay pots in water for 2 to 3 hours before using. If you don’t, they’ll soak up the first watering you give your plants.
Use a strawberry jar to hold a compact herb garden. Cover the bottom with potting soil and insert plants in the lower openings. Anchor them with a layer of soil, then continue layering plants and soil to the top, gently tamping down each soil layer. Thyme (several varieties), marjoram, lemon balm, and trailing mints work well in the side pockets. Put parsley and chives on top, adding a few nasturtiums for color.
Double–pot your container garden to cut down on the need for watering. Find pots that are at least an inch or two larger than those that hold your plants, make a nest of sphagnum moss inside the larger pots, and nestle the smaller containers into the moss. Soak the moss thoroughly. Double-potting slows evaporation.
* * * * * * * *
Freeze green and red grapes separately in plastic bags. Use them as “ice cubes” to chill beverages.
Hollow out red cabbages, colorful bell peppers, or round loaves of bread and fill them with your favorite dips. These creative containers look pretty, and there are no bowls to wash after the party.
Use edible flowers to decorate platters. Apple, borage, calendula, clover, dandelion, daylily, elderberry, lavender, marigold, nasturtium, orange, primrose, rose, violet, and zucchini blossoms are just a few possibilities.
For evening entertaining, set small clusters of votive candles on a framed mirror to add sparkle to the buffet table. Be sure to place the candles so that no one has to reach across them to get food.
NOTES FOR GARDENERS
Instead of using chemical herbicides, pour boiling water on pesky weeds.
Don’t handle plants immediately after a rainstorm, or you might spread fungal diseases.
In late spring, as soon as flowers fade, prune forsythias by selectively cutting a third of the oldest and thickest
stems to within a foot of the ground. This will maintain the natural fountain shape.
Rejuvenate overgrown rhododendrons after flowering by cutting the stems back to 6 to 12 inches. If a plant has multiple stems, cut back one-third of them each year.
CONTAINER GARDENING: A MOVABLE FEAST
Soak unglazed clay pots in water for 2 to 3 hours before using. If you don’t, they’ll soak up the first watering you give your plants.
Use a strawberry jar to hold a compact herb garden. Cover the bottom with potting soil and insert plants in the lower openings. Anchor them with a layer of soil, then continue layering plants and soil to the top, gently tamping down each soil layer. Thyme (several varieties), marjoram, lemon balm, and trailing mints work well in the side pockets. Put parsley and chives on top, adding a few nasturtiums for color.
Double–pot your container garden to cut down on the need for watering. Find pots that are at least an inch or two larger than those that hold your plants, make a nest of sphagnum moss inside the larger pots, and nestle the smaller containers into the moss. Soak the moss thoroughly. Double-potting slows evaporation.
* * * * * * * *