
january gardening tips
January 2014 Newsletter
To-Do List for January
Zone 4
1) Organize your seeds: Discard those too old; make a list of seeds to order.
2) Order seeds of onions, geraniums, and other slow-growing plants now to receive them in time to start indoors next month.
3) Draw your garden plan http://www.organicgardening.com/learn-and-grow/plan-beautiful-vegetable-garden
4) Check the condition of your gardening equipment.
5) Build a garden trellis http://www.organicgardening.com/learn-and-grow/bamboo-trellis-simple-tripod
January 2014 Newsletter
Things to Do in Winter
Extension in Lancaster County
* When using salt to melt ice on walks and driveways, spread it carefully to avoid damage to nearby shrubs; consider using sand or sawdust instead.
* Brush snow from evergreens as soon as possible after a storm. Broom in an upward, sweeping motion. Serious damage may be caused by heavy snow or ice accumulating on the branches.
* When reviewing your garden catalogs for new vegetable varieties to try, an important consideration is improved insect and/or disease resistance. Watch also for drought-tolerant types.
* Analyze last year's planting, fertilizing and spraying records. Make notes to reorder successful varieties as well as those you wish to try again.
* Check stored fruits and vegetables such as potatoes and apples for bad spots which may lead to decay. Remove and use those which show signs of spoiling. Separate others into slotted trays or bins to increase air circulation and reduce decay possibilities.
* To prolong bloom, protect poinsettias from drafts and keep them moderately moist.
* Turn and prune house plants regularly to keep them shapely. Pinch back new growth to promote bushy plants.
* Check all house plants closely for insect infestations. Quarantine gift plants until you determine that they are not harboring any pests.
* House plants and holiday gift plants should not be placed on top of the television. This location is too warm and in most homes too far from windows to provide adequate light.
* During the winter most houses are too dry for house plants. Humidity may be increased by placing plants on trays lined with pebbles and filled with water to within one half inch of the base of the pot. If you heat with wood, keep a pot of water on the stove. The added moisture will be healthier for you as well as your plants.
* House plants with large leaves and smooth foliage, such as philodendrons, dracaena and rubber plant benefit if their leaves are washed at intervals to remove dust and grime, helping keep the leaf pores open.
* To clean crusty clay pots, add one cup each of white vinegar and household bleach to a gallon of warm water and soak the pots. For heavily crusted pots, scrub with a steel wool pad after soaking for 12 hours.
* * * * *
January 2013 Newsletter
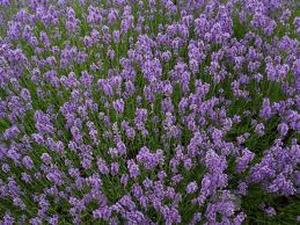
Lavender Plant
by Fran
Washing is fairly new in the West, but the name of lavender is not new, it comes from the Latin lavare (to wash). Lavender was used from ancient times to make perfumes and to scent such soaps as they were.
The Romans washed and took frequent baths in public bathhouses, but after the fall of the Roman Empire, the bath water was tossed away with the rest of the civilization. Even Royalty seldom washed, they used perfume liberally
instead. Elizabeth I took a bath occasionally, but James I/VI never even
washed his hands which he rubbed with a wet edge of a napkin. Water in
16th Century England was often contaminated with sewage and washing in it
probably would not have been very healthy. Even so, somehow out of all this filth and pollution, flowered some of the most beautiful literature there has ever been.
Soap, when available, was very expensive. In 1562, 4 lbs. of gray soap cost as much as a whole pig, but almost anyone could grow lavender, and it was so common that in 1568, the botanist William Turner said it "were but lost labor" to describe it. Lady McBeth, when agonizing over that bad "little hand" of hers, does not talk of soap and water, but of "all the perfumes in Arabia". But of course she could have afforded something better than lavender water. It took two thousand lbs. of lavender blossoms to make ten lbs. of distilled lavender essence.
A bed of lavender or a handful of it in a drawer is a comfort to the nose, the brain, and the heart. It is nearly as good as a hot shower.
(from the book of 100 Flowers and how they got their names by Diana Wells)
* * * * * * * * *
January 2013 Newsletter
Refinishing Containers
by Joan
Looking for something to keep you in the gardening mode over the winter?? Try creating new looks for your containers by applying special finishes.
The Natural Look
Use paint to disguise your plastic containers. Spray or brush on a coat of matte-finish polyurethane, which will dull the plastic sheen. This works equally well with white, green or clay-colored plastics. Spray or brush on a faux finish. Some give the speckled look of granite, or the texture of sand- stone, etc. Use a semi-transparent, dark-colored glaze to streak the pot or darken the areas around grooves and molded decorations. Brush on the glaze, then wipe it off until you have the effect you want.
Instant Antiques
You can make practically any clay, concrete, stone or metal container look old using faux finishes. Scout the paint isles and you'll find paint in spray bottles and cans to simulate just about any weathered natural finish you can imagine.
Transform clay into a fun color accent with acrylic paint. Apply a base coat of polyurethane to the outside of the pot. If you plan to paint inside the top rim brush this with polyurethane also. When dry apply acrylic paint to the side and inner rim. Keep in mind that painted pots are highly visible in the garden standing out among plants and greenery, drawing the eye. if you position them sparingly, or in groups, they can draw attention to various area of your yard. Placing a lot around willy-nilly can give the effect of whimsical or cluttered, depending on the eye of the beholder.
Moss gives a living patina to clay pots as it colonizes the surface slowly over seasons in the garden. The moss spores drift in, find a foothold on the pot and begin to spread, eventually cloaking the sides away from direct sunlight in a soft green finish. The process can take years unless you live in a very moist climate, where a pot can acquire a mossy patina in a single season. Moss thrives in acidic conditions and if you want to hasten the effect try this technique in the spring. Take a clay pot and slather it with yogurt, a naturally acidic milk product, (for even quicker effect, mix the yogurt with a handful of ground moss in a blender). Brush on the yogurt thickly then set the pot in a deeply shaded corner of the garden. When moss has gotten a solid start, (a few weeks) plant the container, being careful not to damage the moss, and move it to a permanent site in the shade.
Designs & Doodads
With acrylic paint and a few brushes, you can transform and ordinary clay container into a Ming Dynasty porcelain, a blue-and-white Delft beauty, a festive Mexican urn, or anything else that strikes your fancy. You may want to play with designs on paper first, using markers or crayons. For complicated designs, draw the pattern on the container after you give it the base color of paint. Then color in the lines with your brush and acrylic paints just like working in a coloring book. Waterproof glue will let you affix just about any- thing to your containers - buttons, seashells, stones, grapevine curlicues or seedpods, for example.
Use the long winter months to give new life to your old pots. Let your imagination run wild and have some fun.
IDEAS FROM ORTHO'S ALL ABOUT CONTAINER GARDENING 2001
* * * * * * * *

January 2013 Newsletter
Cape Primrose or Streptocarpus is an Easy Flowering Houseplant
Virtues: We love easy-to-maintain houseplant cape primrose for their clusters of trumpet-shaped flowers that bloom in stunning purples, pinks, lavenders, whites and blues, frequently with veins in contrasting colors.
Common name: Cape primrose
Botanical name: Streptocarpus
Flowers: Tall stems with clusters of trumpet-shaped, vibrant flowers bloom periodically, throughout most
of the year in luminous colors. These close relatives to African violets can produce spiral seedpods that should be removed to encourage more blooms.
Foliage: Streptocarpus have long, velvety, deep green leaves that grow in rosettes beneath the tall stems of the flowers.
Habit: These houseplants can grow up to 12 to 15 inches tall and wide. Season: If properly maintained, cape primrose can thrive and bloom through any season.
Origin: Originally discovered in South Africa; also grows naturally in Madagascar.
How to grow streptocarpus as a houseplant: Cape Primrose love well-drained fertile soil and bright, indirect sunlight. Be careful not to leave in direct sun due to risk of withering. These houseplants thrive in warm, dry areas with ideal temperatures ranging from 60-75 degrees Fahrenheit. Water when the top inch of soil feels dry and water less during winter; too much water can cause rot. Feed with a liquid fertilizer during the spring and summer seasons. These plants are most successful when repotted each spring. Propagate cape primrose by leaf cuttings.
* * * * * * * * *

January 2013 Newsletter
Molasses As Fertilizer: Information on Feeding Plants With Molasses
by Susan Patterson, Master Gardener
Looking for an easy, low cost way to feed your plants? Consider feeding plants with molasses. Molasses plant fertilizer is a great way to grow healthy plants and as an added benefit, using molasses in gardens can help fend off pests. Let's learn more about molasses as fertilizer.
What is Molasses?
Molasses is the by-product of beating sugarcane, grapes or sugar beets into sugar. The dark, rich and some-what sweet liquid is commonly used as a sweetener in baked goods, as a natural remedy for many ailments and added to animal feed. Even though it is a by-product, molasses is full of vitamins and minerals. As a result, molasses as fertilizer is possible too.
Feeding Plants with Molasses
Using molasses in organic gardening practices is nothing new. The sugar refinement process goes through three stages, each yielding a type of molasses product. Blackstrap molasses is created from the third boiling of sugar in the refinement process.
Blackstrap molasses is high in calcium, magnesium, iron and potassium. It also contains potash, sulfur
and a host of micronutrients. Using molasses as fertilizer provides plants with a quick source of energy and encourages the growth of beneficial microorganisms.
Types of Molasses Fertilizer
Un-sulphered blackstrap molasses is commonly added to organic fertilizers to give plants the necessary carbohydrates and trace minerals that they need to be healthy. Molasses can be added to organic liquid fertilizers, compost tea, alfalfa meal tea and kelp, to name a few.
When molasses is added to organic fertilizers, it provides food for the healthy microbes in the soil. The greater amount of microbial activity in the soil, the healthier plants will be. Add molasses at a rate of 1 to 3 table- spoons to 1 gallon of fertilizer for best results.
Molasses can also be added to water and sprayed on plant leaves or poured on the soil. When the molasses is sprayed directly on plant leaves, the nutrients and sugar are absorbed quickly, and nutrients are immediately available.
Pest-Free Gardens
Using molasses in gardens has the additional benefit of fighting off pests. Because molasses increases the overall vitality of plants, pests are less likely to attack your garden. Use a molasses and water mixture every two weeks, in addition to your molasses fertilizer, for best results.
Molasses plant fertilizer is an excellent non-toxic and cost effective way to keep your plants happy and pest free.
* * * * * * * * *
January 2013 Newsletter
Christmas Cactus, Thanksgiving Cactus and Easter Cactus
Q - I have a“Christmas cactus” that always blooms at Thanksgiving. Is there a way to make it bloom a few weeks later?
A - A Christmas cactus is one of three popular holiday cacti: Easter, Thanksgiving and Christmas. You can probably guess by their names when these festive plants usually bloom; Thanksgiving cacti typically start in late fall and Christmas cacti around a month later. An Easter cactus starts producing flower buds in February.
If you have a Christmas cactus that always blooms around Thanksgiving, it is probably because of one of
the following reasons: it is actually a Thanksgiving cactus or it blooms early due to growing conditions.
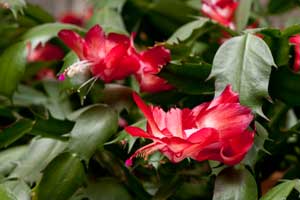
Thanksgiving cacti are often sold as “Christmas cacti” and these two holiday plants look very similar. Both fall under the genus Schlumbergera, have the same color scheme and require the same care. There are two main differences between a Christmas and Thanksgiving cactus: the flowering season, which we have already discussed, and the segments of the leaves. To help determine whether your cactus is a Christmas or Thanks-giving variety, will depend on the edges of the leaf segments. Christmas cacti have smooth, round edges while Thanksgiving cacti have pointy, jagged ones. Check out the pictures below. Note the difference in the
leaves.
If your holiday cactus still sounds like it belongs to the merry Christmas groupings, than it probably flowers early in the season due to the growing conditions. Thanksgiving and Christmas cacti need cool temperatures (roughly 55 to 65 degrees Fahrenheit) to begin the production of flowers, so your cactus is most likely exposed to this change in weather early. You can help instigate when your plant will bloom by keeping track of the temperature outside. When it is below 50 degrees, you can place the container by a drafty window or when it hits the ideal 55 to 60 degree range, place the container outdoors. These cacti are most successful with longer
periods of uninterrupted darkness, around 13 to 16 hours, and shortened days.
My biggest piece of advice for you if you want a Christmas cactus to bloom later in the season, is to make sure it actually is a Christmas cactus and not a Thanksgiving one. When purchasing a new cactus go by the botanical name instead of the common one. A Christmas cactus is Schlumbergera x buckleyi and a Thanks-giving cactus is Schlumbergera truncata. As for now, manipulate your cactus’s exposure to light and temp-erature conditions to try to achieve the perfect blooming season for your needs.
These striking, festive cacti are perfect ways to bring a little joy and cheer to the holiday season.
Thanksgiving Cactus Christmas Cactus
Christmas Cactus, Thanksgiving Cactus and Easter Cactus
Q - I have a“Christmas cactus” that always blooms at Thanksgiving. Is there a way to make it bloom a few weeks later?
A - A Christmas cactus is one of three popular holiday cacti: Easter, Thanksgiving and Christmas. You can probably guess by their names when these festive plants usually bloom; Thanksgiving cacti typically start in late fall and Christmas cacti around a month later. An Easter cactus starts producing flower buds in February.
If you have a Christmas cactus that always blooms around Thanksgiving, it is probably because of one of
the following reasons: it is actually a Thanksgiving cactus or it blooms early due to growing conditions.
Thanksgiving cacti are often sold as “Christmas cacti” and these two holiday plants look very similar. Both fall under the genus Schlumbergera, have the same color scheme and require the same care. There are two main differences between a Christmas and Thanksgiving cactus: the flowering season, which we have already discussed, and the segments of the leaves. To help determine whether your cactus is a Christmas or Thanks-giving variety, will depend on the edges of the leaf segments. Christmas cacti have smooth, round edges while Thanksgiving cacti have pointy, jagged ones. Check out the pictures below. Note the difference in the
leaves.
If your holiday cactus still sounds like it belongs to the merry Christmas groupings, than it probably flowers early in the season due to the growing conditions. Thanksgiving and Christmas cacti need cool temperatures (roughly 55 to 65 degrees Fahrenheit) to begin the production of flowers, so your cactus is most likely exposed to this change in weather early. You can help instigate when your plant will bloom by keeping track of the temperature outside. When it is below 50 degrees, you can place the container by a drafty window or when it hits the ideal 55 to 60 degree range, place the container outdoors. These cacti are most successful with longer
periods of uninterrupted darkness, around 13 to 16 hours, and shortened days.
My biggest piece of advice for you if you want a Christmas cactus to bloom later in the season, is to make sure it actually is a Christmas cactus and not a Thanksgiving one. When purchasing a new cactus go by the botanical name instead of the common one. A Christmas cactus is Schlumbergera x buckleyi and a Thanks-giving cactus is Schlumbergera truncata. As for now, manipulate your cactus’s exposure to light and temp-erature conditions to try to achieve the perfect blooming season for your needs.
These striking, festive cacti are perfect ways to bring a little joy and cheer to the holiday season.
Thanksgiving Cactus Christmas Cactus
|
|
January 2012 Newsletter
Resist the urge to plant early.
Garden centers generally start displaying their bedding plants long before the last frost is over. If you can’t resist the urge to buy early, do restrain yourself when it comes to setting them out in your beds. Frost is likely to destroy them outdoors, so keep them well watered in a sunny window until the danger passes.
Make a splash and save some cash.
You get more for your money when you buy bedding plants by the flat. And a grouping of the same kind of flowers has more impact in your small garden than a mixture of different colors. Even in a bigger space where you want more variety, a repeating border of one plant will tie everything together.
Bigger and “bloomier” isn’t always better.
When you are shopping for annuals, tall plants or those in full bloom may attract your attention first. But in the long run, you’ll have healthier plants if you make bushy, dark greenery your highest priority.
Pinch your plant for healthier blooms.
When you buy plants that already have flowers, it’s hard to nip them off. But your plants will be prettier if you pinch them back. Remove the top portion of main branches, just above a leaf or pair of leaves for a more
compact, bushier plant.
Start with healthy plants.
When buying bedding plants avoid those with yellow leaves. Select plants that have dark green, bushy leaves instead. And if the soil in the pots is dry, especially if it’s pulling away from the sides, the plants are probably stressed. Reject those and wilted plants, as well.
January 2012 Newsletter
MICE
Don’t let mice spend their winter vacation in your garage or potting shed. They’ll seek other quarters if you place a few mothballs in their favorite hiding places as well as near cracks where they’re likely to squeeze
their way inside.
A bulb screen.
Use ½ - inch wire mesh to keep mice away from your flowering bulbs. For individual bulbs, use wire-mesh baskets. In mass plantings, lay a sheet of wire mesh, with the edges turned down, over the planted bulbs before filling the bed with soil.
January 2012 Newsletter
Carrots
Plant carrots with coffee and radishes. To increase your carrot harvest, mix the seeds with unused ground
coffee before sowing. Not only does the extra bulk make the tiny seeds easier to sow, but the coffee aroma may repel root maggots and other pests. As a bonus, the coffee will help add nutrients to the soil as it decomposes around the plants. You might also like to add a few radish seeds to the mix before sowing.
The radishes will be up in a few days to mark the rows. When you pull them, you’ll thin the carrot row and cultivate the soil at the same time.
Sow seeds in a row or a band as thinly as possible - no more than three seeds per inch. Planting in rows is preferable, since it makes weeding easier. Tamp seeds in with the back of a rake to bury them ¼ to ½ inch deep. A few weeks later, thin the seedlings, leaving the strongest plant every two inches in the row for small varieties. Thin larger varieties to three inches apart.
January 2012 Newsletter
Questions & Answers
Q. How important is it to rotate crops in a small garden?
A. Because of the limited amount of soil, very important! It is always recommended that crops be rotated regularly (with the exception of tomatoes, which can stay in one place for three years).
Q. What type of fertilizer is recommended to use on rhubarb?
A. Believe it or not, table scraps. That’s right - mix all of your non-meat table scraps together in a blender, add two tablespoons of Epsom salts, and puree. For fabulous results, pour this mixture on the plants every month or so.
Q. I’ve heard that ladybugs are good for my garden. What do they do and how can I attract them?
A. Ladybugs have voracious appetites; they can eat up to 40 aphids per hour! Other insects on their menu include mealy bugs, spider mites, scale, thrips, and whiteflies. To attract ladybugs to your garden, plant marigolds, butterfly weed, yarrow, roses, or goldenrod. They’re also kind of partial to cucumbers, peppers,
and tomatoes.
* * * * * * * * *
January 2012 Newsletter
HELPFUL HINTS
Construct a rustic indoor trellis. Tired of draping trailing plants over door frames and windows? Give them something to climb on instead. Using wall anchors, if necessary, attach vinyl covered hooks (available at hardware stores) to a wall and hang any reasonably attractive ladder from them, positioning the ladder’s legs on the floor a couple of inches from the wall. It’s easy to train potted plants to grow up and around the rustic
support. It looks nice on a porch too.
* * * * * * * * * * * * *
Double Duty Penny
Drop one penny into a vase of water and add a pinch of sugar to keep cut flowers perkier longer. Who says you can't get anything for a cent these days?
* * * * * * * * *
Drop one penny into a vase of water and add a pinch of sugar to keep cut flowers perkier longer. Who says you can't get anything for a cent these days?
* * * * * * * * *
January 2011 Newsletter
The Indoor Gardener
Let houseplants almost dry out between waterings. If leaves turn yellow and drop, you are over-watering.
Place fichus plants near a sunny window. Keep the soil moist, but don’t let water pool in the saucer.
Check root crops and tender bulbs you’ve stored in the basement or root cellar and discard any that are soft or show signs of decay.
Keep houseplants away from cold windows, and be careful never to pull the curtains and trap them against the glass on a frigid night.
To boost indoor humidity for orchids, place the pots on large saucers filled with pebbles and keep the
pebbles wet.
Discourage spider mites by misting under the leaves.
* * * * * * * * *
January 2011 Newsletter
Herb Garden Information
Herbs can be traced back into the times of the ancient Egyptians and the ancient Chinese. There are also
references in the Bible and medieval documents that show herbs were used by most households.
Growing herbs is something that is very beneficial to gardeners for several different purposes. Herbs may be used to flavor food, for potpourri, for tea, for medical purposes or to even control pests in the garden. Herb gardens can be specialized towards one of these specific areas or a mixture of a few different purposes. They can also be grown in a garden with other species of plants or in containers indoors.
Herb gardens can be grown in different ways such as an indoor herb garden in the kitchen or a small plot in the garden. A small plot of four feet by six feet is a large enough area to support a small family.
Although a popular use for herbs are for cooking known as culinary herbs, they are also grown for their aromatic foliage and some for the beauty of their flowers. They can be used fresh or dried. Some herbs are used as garnish for plates or salads while other types of herbs can be used to perk up the flavor of a dish.
Like all other plants herbs grow as annuals, perennials, shrubs, and trees. When planting herbs, you should use well-drained soil. If you find that your soil is heavy or compacted, you can add organic matter to it. Fertilizers are not necessary either. Most herbs prefer a sunny location although a few prefer full shade. Many herbs will grow well with afternoon shade. Amazingly, very few diseases or insects attack herbs. Sometimes in dry, hot weather red spider mites can be found on low-growing plants and aphids may attach dill, caraway, anise, or fennel. Rust can also affect mint.
Herbs can be bought and planted into a home garden or they can be grown from seeds. It is an honor and a joy to be able to see a plant be grown from a single seed. You are able to enjoy every step of the process from birth to death in a respect. When growing a plant like an herb from a seed the experience is all the more rewarding because herbs are so useful. Almost all herbs can be grown from a seed. Seeds should be placed in a shallow pot or box in the late winter. Use a light, well-drained soil to grown your seeds in. Since herbs do not have a deep root base, make sure not to cover the seeds too much with the soil. They should be planted
shallow. Follow the rule: the finer the seed, the shallower it should be sown. You can transplant the seedlings to the outdoors in the spring. Although most herbs can be grown from seeds, some herbs do not transplant well. Herbs like dill, fennel, anise, and coriander should be planted directly into the garden.
Although growing herbs in a home garden is extremely easy and worthwhile, there is a lot of information you need to know and understand about herbs. Check out the web on the herbs you’re interested in, and you can ask a VGC colleague or Master Gardener for more information. Good Luck!
* * * * * * * * * *
Gardening - In January?
January’s inclement weather is excuse enough to stay indoors. In fact, mild weather in January is regarded with great suspicion by most gardeners and farmers. But there are a few things you can do outside.
- Get in the habit of walking around your property and inspecting trees for storm damage. Remove any broken limbs, making a clean cut close to the trunk.
- Protect a small tree or shrub from extreme cold by surrounding it with a cylinder of snow fencing and packing straw or shredded leaves inside the cylinder.
- Use a broom to gently brush heavy snow off evergreens. If branches are covered with ice, it's best to leave them alone.
- Appreciate the insulating qualities of a heavy snow cover on your perennial bed. If you add to it in the course of shoveling, all the better.
* * * * * * * * *
January 2011 Newsletter
Healing Plants
1. To help fight winter colds and flu, look to herbs known for their strong scents - rosemary, thyme, sage, basil, oregano, hyssop, dill, chamomile, lavender, and others. They have high concentrations of volatile oils that have antiseptic and antibiotic properties, which bolster the immune system.
2. To ease sore throats, make your own gargle by adding a teaspoon or two of any of the following to warm water: cider vinegar, sage chamomile, lemon juice, or raspberry leaves.
3. If you’re prone to sinus infections, try sipping a tea made with oregano. Inhale the steamy vapor for the best effect.
4. When strep or other infections require antibiotics, which kill good bacteria as well as bad, help your body keep its balance by eating lots of yogurt with active cultures. Also boost your vitamin C intake.
* * * * * * * * * *

January 2011 Newsletter
Blooming Holiday
by Shirley Bigalk, Iowa
Q - Some years my Christmas cactus sets buds, other times not. And lots of the buds drop off before they open. Why?
A - Just because it has "cactus" in the name doesn't mean this winter-flowering house plant will like hot and dry conditions.
A healthy Christmas cactus (Zygocactus spp.) may bloom several times during the year but flowers most during the short days of winter. To make sure buds form by Christmas, in mid-October move the plant to a spot where it gets bright daylight, but no artificial light at night. The plant needs six to eight weeks in 12 to 14 hours of uninterrupted darkness each day. And the temperature should stay between 50 and 55°F even at night. But it can be a few degrees warmer during the day. A window in a spare bedroom or basement, where lights are not turned on frequently, is a good place.
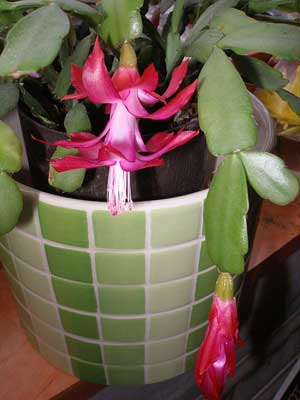
Once the plant sets buds, you can move it out of the dark room, but keep it cool. Water is being added to the pebble-filled saucer in photo at left to increase the humidity around the plant. Don't let the pot sit directly in the water or buds will begin to drop and the roots will rot. When the top inch of the soil feels dry, water thoroughly until water runs out of the pot.
After the flowers are gone, keep the plant on a sunny windowsill. Late winter is the time for potting, but don't do it every year - a pot-bound Christmas cactus will bloom best.
* * * * * * * *
Blooming Holiday
by Shirley Bigalk, Iowa
Q - Some years my Christmas cactus sets buds, other times not. And lots of the buds drop off before they open. Why?
A - Just because it has "cactus" in the name doesn't mean this winter-flowering house plant will like hot and dry conditions.
A healthy Christmas cactus (Zygocactus spp.) may bloom several times during the year but flowers most during the short days of winter. To make sure buds form by Christmas, in mid-October move the plant to a spot where it gets bright daylight, but no artificial light at night. The plant needs six to eight weeks in 12 to 14 hours of uninterrupted darkness each day. And the temperature should stay between 50 and 55°F even at night. But it can be a few degrees warmer during the day. A window in a spare bedroom or basement, where lights are not turned on frequently, is a good place.
Once the plant sets buds, you can move it out of the dark room, but keep it cool. Water is being added to the pebble-filled saucer in photo at left to increase the humidity around the plant. Don't let the pot sit directly in the water or buds will begin to drop and the roots will rot. When the top inch of the soil feels dry, water thoroughly until water runs out of the pot.
After the flowers are gone, keep the plant on a sunny windowsill. Late winter is the time for potting, but don't do it every year - a pot-bound Christmas cactus will bloom best.
* * * * * * * *
January 2010 Newsletter
Dealing with snow
The benefit of snow is that it acts as an insulator, protecting plants from the cold and frost, however, a heavy layer of snow can also cause leaves and branches to break, so it's important to know how to deal with it when it arrives:
• Shake excess snow from the branches of large trees, shrubs and hedges, to prevent them from becoming disfigured by the weight.
• Remove heavy deposits of snow from the roofs of greenhouses or cold frames to let in the light and prevent the structures from bending under the weight.
• Use lengths of string to support the branches of conifers and stop them being pulled out of shape. Branches that move away from the main plant won't spring back into place when the snow melts.
• Avoid walking on snow-covered grass as it will damage the turf beneath and leave unsightly marks on the lawn. It can also encourage the growth of fungal diseases which thrive in the cool damp conditions.
* * * * * * * *
January 2010 Newsletter
It’s Time To Get Out The Seed Catalogs
by Florene
Once the Holidays are over there is a little let down time when you have a chance to finish a new book, relax a little over a cup of good herbal tea and if you don’t already get them, order catalogs to scan for those great herbs you want to grow next summer. Herbs from your own garden give you ten times the taste you get from the dried ones on the supermarket shelves. Best of all, herbs and spices are simple to grow. You simply sprout the seeds, and then harvest leaves and sprigs all summer long. Well, it might be a little more involved than that but well worth any effort you put into growing your own herbs.
Here is a list of some of the catalogs I know to be good. If you Google in “herb seeds” you will have more choices than you can imagine. Go online and order up the catalogs so you can take your time and mark
them up with notes to yourself. I have also provided phone numbers in case you don’t have computer access – call them up and request a catalog:
American Meadows 1-877-309-7333
Burpee 1-800-333-5808
Vermont Wildflower Farm 1-802-425-3641
Territorial Seed 1-800-626-0866
Johnny Seeds 1-877-564-6697
Stokes Seeds1-800-396-9238
Nichols Garden Nursery 1-800-422-3985
Parks Seed 1-800-213-0076
If you don’t already have favorite herbs to grow you might want to try: arugula, borage, chamomile, cilantro, dill, lemon balm, oregano, parsley (both flat and curly), basil, sweet marjoram, thyme, sage, rosemary. After the first year of growing your own herbs, I’ll bet you will add new ones next year!
Happy New Year to all of you!