
April Gardening tips
April 2014

|
|
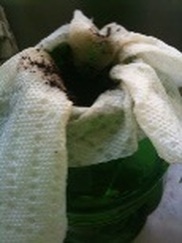
Compost Tea
So, here's how you make it:
1. Find a clean glass or plastic jar (or a peanut jar).
2. Put it on your counter and put a little water in it.
3. Whenever you use an egg, put the shell in the jar. (Use a spoon to crunch them down in there.)
4. Whenever you make coffee, put the used grounds in the jar.
5. After you've put a few egg shells & coffee grounds in, top it off with water, shake and let it sit.
6. Let it sit some more. And let it sit some more. Shake once a day, but it’s not mandatory.
7. Don't let it sit in direct sunlight or over your oven (where it will get warm). You want all the nutrients to leach out of the egg shells & grounds, but you don't want to start an algae farm!
8. Let it sit for about a week.
9. When you are ready to fertilize feed your plants, you just strain out the eggs & grounds (Do this by pouring the contents of the jar through a paper towel into a big cup or bottle).
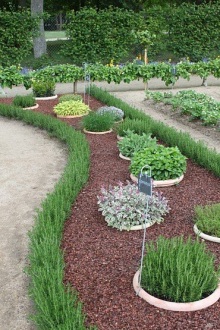
Buried Pot Garden!!
Not only will your garden be extraordinarily charming and tidy, it'll consume less water and energy. Sunken planter gardens like this one provide both form and function. The pots prevent your herbs or plants from overrunning their designated areas, and the mulch keeps unwanted weeds and pests at bay while consuming no water and energy.
Creating a buried pot garden is a beautiful and easy way to ecoscape. Not only will your garden be extraordinarily charming and tidy, it'll consume less water and energy. Sunken planter gardens like this one provide both form and function. The pots prevent your herbs or plants from overrunning their designated areas, and the mulch keeps unwanted weeds and pests at bay while consuming no water and energy. To recreate this look, it's best to use ceramic pots with a wide brim for a standout look. Choose bright, light colors like yellow, white, turquoise and fluorescents for greater contrast against the darker mulch. For the surrounding ground coverage, select mulch, gravel or stones that will off-set your pot color. And lastly, edging your ground cover with rosemary (seen here) or garden borders will help keep it in place.
For mulch options, recycled rubber mulch has ad- vantages over the traditional bark. It's heavier so it's more resistant to blowing all over the path and making a mess, doesn't attract carpenter ants like bark, and is more effective at retaining moisture. It's also eco- friendly to boot, made from recycled tires.
This buried pot garden is tidy perfection.
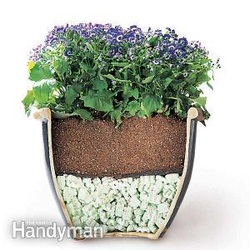
Tips for Moving Heavy Potted Plants
Big outdoor planters are a great way to display flowers, but moving them is backbreaking. Here’s a simple way to cut the weight in half and improve drainage.
Solution:
Buy a bag of foam-packing peanuts instead (available at office supply stores). Fill the pot one-third to one-half full of peanuts, cover with landscape fabric and then add soil. This cuts the weight and saves money, since peanuts cost less than good potting soil. However, a smaller amount of soil means more frequent watering. To slow evaporation, cover the soil with wood mulch.

Flowers multiple cropping
Multiple cropping is well-adapted for use in growing flowers for either decorative or commercial purposes. By correct choice of species it is possible to have at least one crop flowering in the basins as long as climate will permit. A possible cropping program might run like this: plant Holland bulbs first; several weeks before they are blooming, plant gladioli; several weeks before the gladioli bloom, plant flowers having greater leaf surface, such as marigolds, dahlias, or snap-dragons. Since flowers have a wide range of characteristics, many good combinations can be worked out.
* * * * * * *
April 2013
How to Create a Small Garden Anywhere
You can enjoy a small garden in your yard, on your balcony, on house walls,
window sills, and in hanging planters. Learn these skills now to become more
self-sufficient, enjoy great meals later this year, and help your family get
ready for anything.
This is about more than improving your self-reliance skills. Nothing tastes
better than fresh, locally grown vegetables and fruit – especially if you've
grown them yourself. You can take great pride in your accomplishment as well as know exactly what was used to grow your food.
Frankly, enough is known about successful organic gardening methods that no backyard gardener should ever have to resort to pesticides or chemical
fertilizers.
What to Plant
Begin by assessing the area you have available and what you'd like to plant. Consider what fresh vegetables and fruit you enjoy most and are expensive to buy in your area. Herbs come to mind – they are easy to start, easy to grow, and work with many meals. And pound for pound, fresh herbs are
among the most expensive items in the grocery store. No need to waste precious planting space on vegetables that are cheap in your local markets – cabbages and potatoes for example.
Also, don't go overboard. This is the hardest thing to control in the beginning. You don't need six tomato plants, unless you plan on feeding a large number of people or doing some canning. Remember, after planting there's still work to be done – watering, weeding, and harvesting, so be sure you'll have the
time.
Many plants that are traditionally grown on the ground such as cucumbers,
zucchinis, and squash can be grown on a vertical support using less ground
space. When trained, these plants will grow vertically by tying the vines to the support. These should be planted on the north side of your garden so they won't shade the other plants.
Keep Your Planting Start-Up Goals Modest, Attainable, and Sustainable
When deciding what to grow, consider companion planting. Some plants thrive next to other plants or keep away certain bugs. Some good plant pairings are basil, tomatoes, peppers (all easy to grow) and asparagus (a bit more work, especially in the beginning). Basil can help keep flies and mosquitos away, but don't plant it next to sage.
You don't need to spend a lot of money to start. Look at what you already
have that you can use for your garden. Many old plastic containers can be used by drilling holes in the bottom for drainage. Even dollar stores have a
gardening section with planters, garden twine, and vertical supports. These will save you money but may not last as long as more expensive brands. Spring yard sales are another great source of garden starting supplies.
If you go to a nursery or garden store to buy small plants you'll find that
many only sell in six packs or larger, so go with a friend and split the cost.
You'll probably only need three of each type of plant, especially for a small
family. Talk to the people working at the nursery. They're a wealth of
information and will be happy to answer your questions.
* * * * * * * *
April 2012 Newsletter
4 Easy to Grow Mosquito-Repelling Plants
By Eartheasy.com
Before reaching for the chemical sprays, try planting these easy-to-grow plants which have natural mosquito-repelling properties…As the outdoor season approaches, many homeowners and outdoor enthusiasts look for ways to control mosquitoes. With all the publicity about the West Nile virus, mosquito repelling products are gaining in popularity. But many commercial insect repellents contain from 5% to 25% DEET. There are concerns about the potential toxic effects of DEET, especially when used by children. Children who absorb high amounts of DEET through insect repellents have developed seizures, slurred speech, hypotension and bradycardia.
There are new DEET-free mosquito repellents on the market today which offer some relief to those venturing outdoors in mosquito season. But there are also certain plants which are easy to grow and will have some effect in repelling mosquitoes from areas of your home and garden.
Here are four of the most effective mosquito repelling plants which are easy to grow in most regions of the US:
1. HORSEMINT
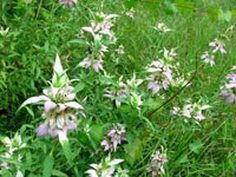
Also known as Beebalm, Horsemint is an adaptable perennial plant which repels mosquitoes much the same as citronella. It gives off a strong incense-like odor which confuses mosquitoes by masking the smell of its usual hosts.
Horsemint is a fast growing, shade-tolerant and drought-resistant plant which reaches a height and width of 2 – 3 feet. It does well in dry, sandy soil and can tolerate salty conditions, which is why it is often found in coastal and beach areas.
Horsemint seeds can be sown indoors in trays for later transplanting, or sown
directly into the ground in late summer in colder climate zones. Midwest and
Eastern growing zones are favoured for growing horsemint. Mature horsemint plants can be divided in spring and fall by dividing into small sections and transplanting into permanent locations. Horsemint can also be planted in pots for moving indoors in cold climate zones.
Horsemint leaves can be dried and used to make herbal tea. Its flowers will also attract bees and butterflies to your garden.
2. MARIGOLDS
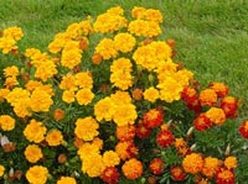
Commonly grown as ornamental border plants, marigolds are hardy annual plants which have a distinctive smell which mosquitoes, and some gardeners, find particularly offensive. Marigolds contain Pyrethrum, a compound used in many insect repellents.
Marigolds prefer full sunlight and reasonably fertile soil. Although marigolds can be planted from seed, starter plants are inexpensive and readily available at most garden centers. Although an annual, marigold will often reseed itself in favourable conditions, or the gardener can easily collect seeds for future germination. Established plants will need to be thinned, and flowers should be dead-headed to promote additional blooms.
Potted marigolds can be positioned near entrances to your home and any common mosquito entry points, such as open windows. The smell may deter
mosquitoes from going past this barrier. While marigolds can be used as border plants around the patio, we do not advise putting marigolds on the patio table since the bright blooms may attract wasps.
Besides repelling mosquitoes, marigolds repel insects which prey on tomato plants, so you may want to plant a few marigolds in your tomato bed for added protection.
3. AGERATUM

Also known as Flossflowers, Ageratum emits a smell which mosquitos find particularly offensive. Ageratum secretes coumarin, which is widely used in commercial mosquito repellents.
Ageratum is a low-lying annual ornamental plant which reaches heights of 8 – 18”, and is easily recognized by its blue flowers, although there are varieties with pink, white and violet blooms. This plant will thrive in full or partial sun and does not require rich soil. It is often displayed in rock gardens where low-lying plants are favoured.
Although the leaves of Ageratum can be crushed to increase the emitted odor, it is not advisable to rub the crushed leaves directly on the skin.
4. CATNIP
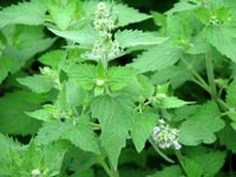
Catnip is a natural mosquito repellent. In August 2010, entomologists at Iowa State University reported to the American Chemical Society that catnip is ten times more effective than DEET, the chemical found in most commercial insect repellents. According to Iowa State researcher Chris Peterson, the reason for its effectiveness is still unknown. “It might simply be acting as an irritant or they don’t like the smell. But nobody really knows why insect repellents work.”
In the laboratory, Peterson put groups of 20 mosquitoes in a two-foot glass tube, half of which was treated with nepetalactone, a biologically active
characteristic constituent of catnip. After 10 minutes, only an average of 20
percent – about four mosquitoes – remained on the side of the tube treated with a high dose (1.0%) of the oil. In the low dose test (0.1%) an average of 25% – five mosquitoes – stayed on the treated side. When the same tests were conducted using DEET (diethyl-meta-toluamide), approximately 40 to 45% – eight to nine mosquitoes – remained on the treated side. A ten-fold higher concentration of DEET was required to obtain results similar to those of the Catnip.
Catnip, Nepeta cateria, is very easy to grow. This perennial herb is related to mint, and grows readily both as a weed and a commercially cultivated plant in most areas of the US.
While catnip will repel mosquitoes in close proximity to the plant, some people apply crushed catnip leaves or catnip oil for more robust protection. Bear in mind, however, that cats will respond to you similarly as they would respond to the plant itself. Cat owners may want to choose an alternative plant for repelling mosquitoes.
While the plants mentioned in this article have been shown to have mosquito-repelling properties, there are environmental variables that can mitigate their effectiveness. A breeze may direct odors in the opposite direction if advancing mosquitoes, reducing the plant’s effectiveness. New formulations of non-toxic mosquito repellents are commercially available, and are advised for people who want to enjoy the outdoors without the annoyance of persistent mosquitoes.
* * * * * * * *
April 2011 Newsletter
AZALEAS
Prune over-wintered potted azaleas to keep them shapely, then repot into containers that are about an inch larger.
Prune over-wintered potted azaleas to keep them shapely, then repot into containers that are about an inch larger.
April 2011 Newsletter
Sow hollyhock seeds in early spring in a sunny spot along a garage, outbuilding, or fence, where they can self-sow freely in succeeding years.
Sow hollyhock seeds in early spring in a sunny spot along a garage, outbuilding, or fence, where they can self-sow freely in succeeding years.
When substituting fresh herbs for dried, remember that 1 tablespoon minced fresh herbs equals 1 teaspoon dried.
April 2011 Newsletter
SIGNS OF SPRING
When the leaves on the trees turn their backs to the west, a storm is just around the corner.
Red sky at night, the next day is a delight.
Red sky in the morning is a storm warning.
When the bees leave the flower patch, the rains are a'coming.
When the fireflies are heavy, the weather will be bright and sunny for the next three days.
* * * * * * * * * * * *
April 2011 Newsletter
Lily Locale
Lilies are a favorite for my garden and I plan to increase the numbers this summer. If you’ve never had the pleasure of tending these beauties, you may not realize that their location has to be chosen very carefully to ensure good growth. Here’s what they need to get off to a good start:
Perfect drainage. A gentle slope will do. If your site is level and your soil is heavy, you need to build and prepare raised beds for the bulbs.
Air circulation. A good breeze can keep many garden pests and diseases away.
Sunlight. At lease until 2 p.m. Filtered sunlight or semi-shade brings out the more delicate colors, but makes weak stems and soft flowers. Don’t plant lilies near walls, walks, or driveways that reflect sun or heat.
* * * * * * * * * * * * *
April 2011 Newsletter
Marigolds to the Rescue!
Marigolds are a mighty mosquito repellant, so plant them in and around your outdoor living areas and vegetable garden to help keep pesky mosquitoes away.
* * * * * * * * * * * * *
Marigolds to the Rescue!
Marigolds are a mighty mosquito repellant, so plant them in and around your outdoor living areas and vegetable garden to help keep pesky mosquitoes away.
* * * * * * * * * * * * *
April 2011 Newsletter
Easy Peonies
Select a sunny, well-drained place for your peonies. They will tolerate some shade, but should only have sun for half of the day. Don’t plant them too close to large trees or shrubs that will rob them of the food and moisture that they need to grow.
* * * * * * * * * * * * *
Easy Peonies
Select a sunny, well-drained place for your peonies. They will tolerate some shade, but should only have sun for half of the day. Don’t plant them too close to large trees or shrubs that will rob them of the food and moisture that they need to grow.
* * * * * * * * * * * * *
April 2011 Newsletter
Below is a list of 2011 Alaska Certified Seed Potato Growers and certified varieties. These growers can provide Alaska Grown products to reduce the risk of importing of invasive pests and diseases.
Mat-Su / Anchorage Area:
Jay Dearborn 980 S Trunk Rd., Palmer, AK 99645 745-3501
Greg Kalai 8621 Witherspoon Circle, Anchorage, AK 339-1966
Little Susitna Farm 8470 N Russet Rd., Palmer, AK 746-5496
Art Peterson HC 89 Willow, AK 99688 733-2372
Pyrah’s Pioneer Peak Farm PO Box 966, Palmer, AK 99645 745-4511
Vanderweele Farms PO Box 461, Palmer, AK 99645 745-3597
Varieties available:
|
Aeggeblomme
All Blue Allagash Bake-King Bush’s Peanut Cal White Cal White Russet Caribe Cherry Red Chieftain Daisy Gold Dark Red Nordland Denali French Fingerling Frontier Russet * * * * * * * * * * * * * |
German Butterball
Goldrush Green Mountain HiLite Huckleberry Iditared Idarose Jemseg Kennebec Keuka Gold King Edward Lehigh Lemhi Long Red Magic Molly |
Maine Stay
Marcy Monona Mrs. Moehrle’s Yellow Flesh NorDonna Norgold Russet NorValley Peanut Pike Purple Viking Ranger Russet Red Gold Red Pontiac Red Beauty |
Redsen
Robinta Rote Eerstling Russet Burbank Russet Norkotah Sangre 11 Shepody Sunrise Superior White Rural New Ted’s Red Yellow Finn Yorker Yukon Gold |
April 2011 Newsletter
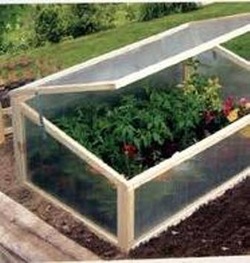
THE MAGIC OF COLD FRAMES (Mel Monsen)
by Gayle
"A Cold-frame," Monsen says, "is simply a box covered with some sort of transparent top and comes in many different sizes and shapes and is used for a variety of purposes."
Some of the advantages to this protected plant bed are wind protection, warmer temperatures especially at night, a controlled microclimate, the ability to control the humidity, and a means to extend the growing season. You may use one to "harden off plants in the spring," or to grow different varieties as with a greenhouse which may need higher temperatures or humidity than our Alaskan summer provides.
Cold-frames can be built with a variety of materials and are often built into the ground or against an
existing structure. The transparent top might be old windows, plastic, doors, maybe even a pot covered with plastic.
When choosing where to put your cold-frame keep in mind exposure to the sun and how close the frame is to the house and water. Excellent drainage is essential, but the angle the top is to the sun is not so important in Alaska where the summer sun is high.
Some pointers: it helps to have a top where the water can run off rather than collect, and you can line the inside with Styrofoam (below grade also) for even better insulation. A southeast or east exposure is a good choice in Alaska in order to capture morning sun/heat after our cooler nights.
The main drawback to a cold frame is you can’t just cover up your seedlings, etc. inside the cold-frame and walk away; It can get too hot. It needs some way to be opened. This could be an automatic system but often is done by monitoring the temperature and lifting the lid as needed. And - you need a system to keep the lid open without being blown off. Another issue is pests can multiple quickly in this environment.
Whether you want to grow a warm weather crop such as basil or melons, extend your season, winter over ‘hardy’ perennials, propagate varieties or store root crops, consider a cold-frame.
* * * * * * * * * * * * *
April 2008 Newsletter
Herb Corner
By Florene
The Herb of the Year for 2008 is the Calendula. I don’t know who determines which herb gets the honors each
year, but in the last few weeks have come across a ton of great ideas for using Calendula – in addition to its being a bright face in your garden. If you have a sunny window, you can start Calendula seeds any time now.
There is a great article in “The Herb Companion” for March 2008 on growing and using Calendulas.
There are ideas for Crisps, cornbread, mashed potatoes, and cakes. In Jekka McVicar’s “New Book of Herbs” she explains how this ‘pot marigold’ has been used for centuries in Arab and Indian cultures as a medicine, food colorant, and cosmetic. If you dream about Calendulas there are good things to come!
Plant these hardworking annuals in any soil that is well drained and sunny. They grow well in pots and combine well with other herbs. You’ll want to deadhead frequently to encourage continuous bloom. Both flowers and leaves can be used in cooking and salads. It is called the Pot Marigold because it is great used in the cooking pot and for biscuits, butters, salads and omelets.
Now, here’s something you may not have heard. Calendula can be used medicinally as a remedy for skin complaints: it is effective for most minor skin problems, cuts, grazes, wounds, inflamed skin including minor burns, sunburn, and fungal conditions like athlete’s foot, yeast, and ringworm. The sap from the plant stem
has a reputation for removing warts, corns, and calluses. Calluses? This is just what you need after you have been gardening for a while!
For additional information on this fun plant go to:
www.HerbCompanion.com or
www.HerbsforHealth.com
* * * * * * * * * * * * *
April 2008 Newsletter
Pre-Sprout For Better Results
From “Newspaper, Pennies, Cardboard, and Eggs for Growing a Better Garden, by Roger Yepsen
by Jill
To increase the percentage of seeds that will make it as plants, pre-sprout them rather than trusting that
garden condition will be favorable. The germinate seeds will get off to a faster start once they reach soil or planting medium. The system works particularly well for plants that need warmth to get under way, including cukes, melons, pumpkins, and squash.
Here’s what you do:
1. Dampen a sheet of paper towel that’s been folded over once or twice to make a blotter.
2. Arrange the seeds over the surface without allowing them to touch.
3. Place a single damp sheet of towel on top of the seeds, press down to help hold them in place, then slowly roll up the toweling.
4. Place the rolled toweling in a plastic bag. Leave the bag open and put it in a warm place, out of direct sunlight. Take a peek at the seeds each day to determine when they’ve begun to sprout.
5. Plant the pre-sprouted seeds in potting mix and place them under fluorescent light or in sunlight
* * * * * * * * * * * * *
April 2008 Newsletter
A Ticklish Cure for Spindly Seedlings
by Jill
Seedlings are apt to become leggy if light levels are too low. Keep the fluorescent lights close to the seedlings and gradually move them up as the seedlings grow. Also, seedlings will have stockier growth (and a better chance of standing up to the elements) if you agitate them just a bit. Tickle the seedlings with a feather for a few minutes a day. If you’re too busy (or would feel a little foolish) to do that, let a fan do the work, setting it up to blow gently over the plants.
* * * * * * * * * * * * *
April 2008 Newsletter
Put the Damper on Damping-Off
by Jill
A tiny forest of just-sprouted seedlings may be felled by fungi unless you take precautions. Try these reliable
remedies.
Damping-off is a fungal disease than can rapidly lay waste to entire flats of vulnerable young seedlings. You’ll know it by the afflicted stems, which may take on a water-soaked appearance or turn thin and wiry and the soil line. The unsupported seedlings topple and die.
As a preventive, moisten the seed-starting medium with a mild homemade fungicide. To one gallon of water, stir in one tablespoon of clove oil (available at supermarkets and drug stores, as well as by mail order) and a drop or two of dishwashing soap. Among various powerfully scented herbs and spices, clove has been found to be particularly effective against two principal soil-borne pathogens.
You also can buy a fungal control agent formulated to prevent damping-off, marketed as SoilGard. It contains dormant spores of a beneficial fungus. When mixed with water, the fungus comes to life and puts off an antibiotic substance. Another product, Mycostop, harnesses a beneficial bacterium that controls or suppresses damping-off and other soil-borne troublemakers as it grows among the seedlings’ roots. It too can be mixed with water for use as a soil drench.
An additional step that takes little time is to scatter dusting of milled sphagnum moss over the soil surface.
This thin layer will help keep seedling stems drier, suppressing disease and the moss also contributes a certain antimicrobial effect. Note that this product is marketed in small bags – don’t confuse it with baled peat moss. To make it easier to apply a thin layer, you can give the moss a spin in a blender to reduce the particles to dust.
Water Warily: Avoid casually splashing when watering seedlings, at the risk of spreading soil-borne diseases
to many plants. Seedlings in plugs may avoid being infected by sick neighboring plants, but if you see signs of damping-off in one part of a flat, remove the entire flat from the area and discard it.
* * * * * * * * * * * * *

April 2010 Newsletter
When Easter lilies stop flowering, cut off the stems and store the bulbs in a cool, dark place.
Plant the bulbs 4 to 6 inches deep outdoors in a sunny spot after any danger of frost has passed.
* * * * * * * * * * * *
When Easter lilies stop flowering, cut off the stems and store the bulbs in a cool, dark place.
Plant the bulbs 4 to 6 inches deep outdoors in a sunny spot after any danger of frost has passed.
* * * * * * * * * * * *
PLANTING GREEN BEANS IN ALASKA FOR EARLY CROP
by Pat T
For green beans in June, this is what I do:
I usually use Contender or Provider seeds and start them on May 1, soaking the seeds overnight in my sprouter jar with a screen on top. I rinse them in the morning and drain upside down for a few minutes, rinsing and draining four times a day.
As soon as I see sprouts, I keep them in a bowl where they can spread out. I put water in the bowl and drain them well, being careful not to break the roots and sprouts, putting a loose piece of paper towel over the top between rinsing.
Then I let the seeds sprout until they have green leaves and roots on them and plant them gently into four
packs, one to each cell. I put them under bright lights and set outside if the weather is nice to harden them off and use IRT (infrared transmitting plastic) over the rows for a few days to heat them up after putting in fertilizer and compost.
June 1, I plant them in rows about 8-12 inches apart. It’s best to use irrigation under the plastic or fabric, but I don’t use it, so I water in the holes using floating row covers over hoops to keep in the heat. When using this method, I pick green beans June 15, which continues for many weeks.
PLANTING PEAS, PEA PODS, & SUGAR SNAP PEAS
Pea seeds are sprouted the same as beans, but I start earlier (around the second or third week in April) so I can plant them outside about May 7, along with my salad garden. I don’t sprout them as long and put them in the ground when the roots get long and the leaves just start to show.
Those I don’t plant in the ground I put into six-packs to sell at the VGC plant sale. By sale time, they have grown tall and get a head start so people are more likely to buy them. I prefer short pea plants, but last
year they were very tall. Water well after planting.
PLANTING VGC’s CANDY ONIONS
Prepare the soil with fertilizer and compost. I plant the onions around May 7 with just a little of the green top showing (to get more white part) about three inches apart in all directions in my three-foot beds. Water well.
I put floating row covers over the plants to keep out the onion/root maggots, which used to eat the onions. They just disappeared.
The onions get huge by the end of summer, but I harvest the smaller ones for salads throughout the season. By the end of July, the row covers can come off but if it is sunny the plants need to be hardened off a little each day to prevent burning. The green part of the plant can get two feet tall and is very crunchy, juicy, and delicious. The onions are harvested after a frost.